


The gamers guide to warez.
Trang 1 trong tổng số 1 trang

 The gamers guide to warez.
by Admin Sun 22 Aug 2010, 12:33 pm
The simple user guide for running various games from different platforms.
Incomplete 0.47 version.
Most of the commonly used ones will be added.
Due to scarcity of older models of consoles, some will not be added since I can't buy one on my country's local network.
If you need one that is not up there, post an request.
Most of the booting methods Ive tested them myself to confirm that they are working, some I took off from other sourced guides.
If an newer method is available I will try to put it in.
More to come and will be revised. Feedback is welcome.
If a modchip solution is available, it will be listed in the contents for each console.
A modchip simply makes game running easier since you don't require much hassle, the console just works exactly like what it normally does except you removed most limitations.
1/8/2009
The hardware I'll be using are:
Xbox with motherboard revision 1.6 with a Duo X2 GS Modchip.
Xbox 360 Falcon revision with a Lite-On DVD drive flashed with Ixtreme 1.5
PS2 90002 series with Swap Magic 3.6
Wii Korean model with D2E drive epoxy, System Menu 3.2U and softmodded with Bannerbomb.
AMD Athlon X2 5000+ with Deepcool Buffalo cooler.
Asus M2N68
Hynix DDR 2 800 2Gb x4
Asus AMD HD4850 Matrix 512Mb
Enermax Liberty 620W
Cooler Master Centurion 5
________________________________________________________________________
Contents:
0. Introduction_________________[DTGFI]
1. PC games___________________[DTGFPC]
2. Sony Playstation (PSX)________[DTGFSP] Modchip
3. Sony Playstation 2 (PS2)_______[DTGFSP2] Modchip
4. Sony Playstation Portable (PSP) credit goes to The-Punisher
5. Microsoft Xbox_______________[DTGFMX] Modchip
6. Microsoft Xbox 360____________[DTGFMX360]
7. Nintendo Gamecube___________[DTGFNGC] Modchip
8. Nintendo Wii_________________[DTGFNWii] Modchip
9. Nintendo Dual Screen (NDS)____[DTGFNDS]
10. List of common copy protections_[DTGFCP]
11. General tips__________________[DTGFGT]
12. Overclocking__________________[DCO]
________________________________________________________________________
[DTGFI] Introduction
Why did I write this guide?
Most users will be quite new on some parts of the gaming world.
Sometimes we need information fast, because we are not very patient.
I was bored and the forum needed one.
I wanted to improve this forum and I like to help people.
How to use this guide?
I made it easier to browse it. So look up the console you want to use.
Use the short cuts I have listed under here.
Highlight the code in the big brackets and Control C.
Control F and in that box Control V. Click find and Voila.
This is best used under Firefox 3.5 as you can enlarge it or decrease the size.
So what about some rough edges?
Not everything will be as it seems.
I might have missed some bits or the names could be something else.
Its reality.
Some copy protection I will refer as CP, will sometimes make running some
games more trickier.
What is mostly involved?
Well for the starters you need to download every part of an compressed
archive. Commonly they use Winrar (.rar) or 7-Zip (.7z)
Most of the cases just put them in one folder and extract the first one.
Type the password if required.
Some archives such as Winrar ones you have to extract not the first one,
but the .rar one.
Remember compare all the archives with the result file. If one thing is odd,
its a good idea to check again.
For consoles, if your going to Modchip you have to buy that chip and hope someone will install it for you, if not you have to get soldiering equipment and DIY.
On Xbox 360 its again unavoidable to purchase extra hardware, however if you going to pay a little extra, you don't need soldiering equipment, however some parts are needed if your going to flash the drive yourself.
_______________________________________________________________________
[DTGFPC] PC games
For games on Windows, its a good idea to check for video card driver updates from Nvidia or ATI, according to your video card.
With this your looking generally at Rips, direct Image dumps or the new Steam versions.
Firstly Rips:
Rips are ones that had the Movie's called CGI's and sometimes Music is removed too.
It is used because it saves space and bandwidth for some users.
Usually an instruction is included.
If not look for an obvious launcher, usually called setup.exe. Install.bin
Most are compressed in an archive that looks like an DOS window.
It takes awhile to extract.
Remember most games require an registry entry so you might need to run an registry file,
usually called Registry.reg etc.
So generally your looking for an .reg extension.
Sometimes an Direct X update is required and generally these don't provide it.
Commonly these days Direct X 9.0c is alright for most games.
Of course for Vista, Direct X 10.1 is a good idea for your OS.
Secondly Direct Image Dumps:
Direct image dump's are those games that is near perfect of the original retail disk.
You will often get .iso, .mdf/mds, .ccd/img/cue, .bin/cue, .nrg etc.
For this you need Daemon Tools or Alcohol 120% which are the commonly used
virtual drive emulators.
They are very straight forward and just need you to mount the image with it.
In Alcohol you just right click on the virtual drive on the bottom of the window usually
called SCSIVAX and select mount then find and double click the image file.
Note: the image file is usually in an extension such as: .iso, ccd-sub-cue, bin-cue, mdf-mds and such.
In Daemon Tools just open it and there will be a lighting bolt thing on the right hand
side of the desktop. Right click on that and select Emulation- all options on.
After right click on the lighting bolt thing again which is green now,
this time that select Virtual CD\DVD Drive and select the set number of devices- 1 to
4 depending on your needs. Lastly left click on the lighting bold thing and select
mount since there is only one option. Choose the image file.
Install the game as usual.
Newer games tend to have virtual drive blacklisting so you have to use a tool
such as Starforce nightmare, safe disk 4 hider etc. Play with them yourself
to get the hang of it.
Note: Starforce Nightmare is complex in someway and you can brick your
physical device nodes which is bad.
Most games are not 1:1 dumps which means they can't fool the copy protection checks.
The reason for that is because it takes over 4 hours to dump an 1:1
image and it has low chance of success.
While an decent image will take 20 minutes per DVD and 5 minutes per CD.
So if its not an 1:1 dump you will need an No CD fixed exe commonly
referred as No CD Patch, this is wrong.
Get an No CD fixed exe from Gameburnworld or Gamecopyworld's game fixes.
You must know which version the game is in, if its an direct image dump
its usually 1.0
Get that file and overwrite the original exe from the installation folder
that you specified when you installed the game.
Done and make sure you keep that image file for future usage as
you might need to reinstall your OS which will delete every registry entry.
The thing that is good about Direct Image Dumps is that you can update it,
on default it has an virgin exe.
So when your updating from 1.0 to another version,
replace the fixed exe with the virgin exe.
Update it and replace the updated virgin exe with the fixed one
corresponding with the version you updated it to.
Harder example of CP:
Now there is one more trick like with the newer Custom Securom 7 versions.
Sometimes you don't just replace the exe or replace an .dll file eg.
Paul.dll which is used in Custom Securom 7.
With that being said some games like Bioshock has those Securom 7
bundled with activation checks using an online server, it depends on your
luck. With Bioshock this server check is right after installation.
Now you can delay it by unplugging the Ethernet cable. But the bad thing
is about timing, it deletes the installation and you have to start again.
So you have to bypass that by making another folder, copy the name from
the installed one to the currently made one.
So the trick here is right after you install it with the Ethernet cable unplugged,
don't do anything on the installer.
Now with the installation folder rename it to Bioshock 2, now create another
folder called Bioshock.
Now click next and it will delete the dummy installation folder.
Now you must run the .reg file and overwrite the edited paul.dll with the
virgin one. Done
Bioshock method 2 fast: right after it asks you to insert the original disk during the last part of the installation, kill the process in Task Manager/processes and under description it should only have setup.
The name will have an _ in the line.
Afterwards click okay and the Bioshock folder will remain with the files on the installation directory you requested.
Easier example of CP:
Now an easier example of an Custom Securom 7 will be the game Crysis
Warhead. This game is easier since the activation check is the first time
you run the game.
So there is no timing involved, just before you run the game replace the
virgin .dll with the edited one. Done
Steam type games are pretty straight forward and are very similar to Rips,
they provide an installer and instructions.
_________________________________________________________________________
[DTGFSP] Sony Playstation
With this type of console game, it has to be direct image dumps, 1:1 dumps are not possible.
So to backup an PS game you need an cd reader or better, with Clone CD.
The interface is straight forward so just use the game cd setting and change the audio read speed to slow since its Mode 2 XA data type there isn't much ECC (Error Correction Code).
History of Playstation backups:
Originally backups were created using CDRWin but now its an outdated program that just supports CDs.
CDRWin was a great program originally since it has Cue sheets. Nowadays Nero can do it too.
Running an backup is achieved by many methods:
1. Action Replay, Gameshark or Breaker Pro which is the method without soldiering anything to the motherboard, but require you to swap disks.
2. Use an game enhancer which is just plugging in the slot in left of the back side of the console.
_________________________________________________________________________
[DTGFSP2] Sony Playstation 2
With this type of console game it is very straight forward, many programs will make an
decent direct dumps, again 1:1 dumps are not possible because we can't print an laser etched barcode
near the ring of the disk.
So to backup the DVD game use Ultra Iso's Make CD/DVD image's function. Use any speed and start
dumping. Normal DVD's (DVD5) that are in perfect conditions should take less than 10 minutes.
Dual Layer DVD's (DVD9) that are in perfect conditions should take about 20 minutes.
CD games are tricky and you need Clone CD with modified settings.
To burn an PS2 DVD game just use Ultra Iso's Burn Image, chose the dumped image and set an speed.
Usually use the speed rated on the disk. Slow speeds won't make the burn quality better since faster speeds
usually use CAV (Constant Angular Velocity) and slow speeds use CLV (Constant Linear Velocity).
All PS2 DVD games can be dumped and burnt using most dvd imaging programs.
Booting an game:
To start an PS2 game you can use 8 methods:
PS2 Playstation driver exploit (requires a original PS game)
Action Replay/ Codebreaker/ Gameshark disk (requires original one)
ESR via FMCB 1.8 (requires a method to install FMCB)
Memento 32 Memory Card
Datel 64MB memory card (AKA Gate crusher)
Swap Magic Disk (requires original one)
HD Loader/ HD Advanced
USB Extreme
Swap Magic Method:
Boot the Swap Magic disk, when the splash screen shows
For old models SCPH 1x00x-5x00x use an credit card with an hole cut in the top of the rectangle on the shortest side. Cut of the size of an hole punch.

Now take off the front cover of the PS2's DVD tray, look at it carefully before you take it off, it should come off with minimal force.
Look for an silver pin, it should be between the left to the center of the tray.
Slide the card inside the console, grip the pin with the hole and slide it to the right. The DVD tray will be loose, using minimal force pull the tray out and swap disks.
Push the tray back in and slide the pin left with the card.
Tap X on the controller and the game will boot.
Alternatively use flip tops V4-V10 PS2 consoles.
For PS2 models 7x00x models you have to use the magic tools V3 which is easier to swap disk's once installed or use an flip top designed for slim PS2s. Or you could block the lasers manually by opening the console.
For PS2 models 9x00x series, you have to use Modchip or Swap Magic Disks with Magic tools V4 since the DVD driver exploit has been fixed, so Memento 32, PS game exploit and free MCB won't work.
Since a cheatdisk is also a valid game like program, you can also use a cheatdisk and block the sensor 1.
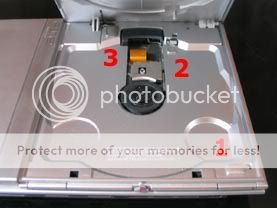
From the above diagram for SCPH-7x00x series PS2, block all 3 sensors, I prefer using a non metallic stick, so I use a piece from a cotton bud, cut out one of the sides that has the cotton bud, move sensor 2 to the right push it into sensor 2's left hand side as deep as you can get, cut out the remaining bits.
The reason I use this for sensor 2 is because the Magic Keys have a disk scratching problem for sensor 2's key.
For 9x00x series PS2, blocking sensor 1 is the only requirement.
Memento 32 Method:
Your games must be patched with the included patcher before this, otherwise it won't work.
Power on the PS2, put the patched disk in (you have 10 seconds before it boots the default ps2 OS).
The screen will stay blank for about 20 seconds as it boots without the Playstation 2 Logo.
Thats it.
HD Loader/ HD Advanced:
Must have the PS2 network adaptor V3-V10 (SCPH-3x00x to 5x00x)
Must have HD Combo or a homemade PS2 IDE adaptor V12/V13 (SCPH-7000x)
IDE hard disk, for older HD Loader versions don't have 48bit LBA so you can only read 137 Gb of any hard disk. HDL 0.8c has 48bit LBA.
One of the original disks or you can just use a hacked ELF or using a backup via modchip.
_________________________________________________________________________
[DTGFPSP] Sony Playstation Portable (PSP)
I can't provide much on these, I haven't got too much time to do research and I don't have a console with me so I can't experiment.
From this date, PSP model 3000 series can only run homebrew, that excludes running image backups of games.
Currently official Sony PSP firmware is 5.51.
Currently the only newest custom PSP firmware that has a updated kernel is the 5.50 GEN firmware,
this firmware can run homebrew and image backups of games.
_________________________________________________________________________
[DTGFMX] Microsoft Xbox
This is currently the most annoying type of console to dump its games.
Do not attempt this unless you have plenty of patience and can waste some DVD's.
Success rate is low and is heavily dependent on what FTP program you dump your games and patch your xbe's with.
The process is annoying to begin with, you have to FTP your Xbox to your PC.
Either crossover cable or with router.
This method is done using crossover cable (CAT6) directly with computer.
How to dump original Xbox games:
You will need:
Craxtion 4(Maybe buggy)
Clone XB v2.3 Beta
Windows XP Professional SP3 (recommended)
Xbox Media Centre Dashboard or Evolution X (recommended)
Crossover cable (CAT6)
In dashboard:
1. Set IP to 192.168.0.3
Set Subnetmask to 255.255.255.0
Set Default gateway to 192.168.0.4
2. Disable Xbox game autoboot.
3. You must leave it in the dashboard to dump your games.
In windows:
1. Open Network Connections under Control Panel.
2. Open Local Area Connection using right click and click properties.
3. scroll down to Internet Protocol (TCP/IP).
4. Click on that and click properties.
5. Click use the following IP address:
6. Fill out the details I used:
IP address: 192.168.0.4,
Subnet mask: 255.255.255.0
Default gateway: 192.168.0.4
Important: you must remember the factory IP settings.
7. Save the options.
8. To check if correct use Start/Run, type CMD and use ipconfig command.
9. Open Craxtion and double click on Xbox.
10. Set IP to 192.168.0.3
Set Subnet mask to 255.255.255.0
11. Click connect and hope it shows the partitions.
12. Insert the Xbox game into the Xbox and start Disk Ripper Wizard in
Craxtion.
13. Create a folder which you want to rip to and start ripping.
14. Now open CloneXB v2.3 Beta.
15. Under PC settings, choose your desired folder to save the compiled image.
16. Click the second button on the bottom.
17. Choose the folder that you dumped the game files and wait until it finishes creating your image.
18. Burn the disk image to a DVD-R.
Note: if the game is too big remove these files in the root directory:
dashupdate.xbe,update.xbe,downloader.xbe. They are safe to remove.
Some games have dummy data, remove these to save space, use a hex editor to check the file individually, some are obvious.
1kb the dummy files using a renamed text pad with a space in its contents.
If CloneXB fails to startup run it in Windows 2000 capability.
I used 2 programs which can do the same thing since both programs gave me some issues. Craxtion is terrible at compiling images.
Notes: Vista might work, but is a bit harder to configure.
If you want to rip a different game, its a good idea to disconnect by clicking on the xbox in windows, as FTP information doesn't get updated.
Remember to change IP in your windows back to default IP settings otherwise you will not be able to connect to the internet.
Burning the game is straight forward use Imgburn's write disk function and use a DVD-R disk.
The 80 conductor IDE cable mod:
By swapping the old 40 pin IDE cable to a 80 pin one, you can see over 20% increase in HDD performance from the Xbox, as the Xbox is capable of ATA 100 transfer speeds, its limited by a ATA 66 IDE cable.
This is because Microsoft tries to save money per Xbox and its a common sense to do that.
Tools required:
A set of Torx screw drivers, (Recommend Talismoon Moonlight set)
80 Conductor IDE cable ATA 100 or ATA 133
Xbox
patience.

Take your Xbox apart, Flip it upside down.
Remove 6 Torx 20 screws, 4 is under those rubber feet and 2 is under 2 stickers.
Flip it back up and lift off the lid.
Now comes the tricky part, you must take off 1 screw to remove the HDD rack and in the process try to lift the rack not wiggle it around inside the case as this might bend some capacitors.
Disconnect the IDE cable and 4 pin molex.
Use a permanent marker to mark the little yellow DVD cable.
Remove another 2 screws to remove the DVD drive.
Remove the DVD drive.
Now you have the IDE port exposed, look at the cable and connect accordingly, do not fold it like the factory one as it has a high chance of not being long enough.
As mine was shorter than the factory one, I had to bend the cables a bit accordingly and tied some electrical tape to avoid the screws being screwed into the cable.
Reconnect cables and attach the console back, if everything goes well you should be able to boot up without service errors.
Installing a custom dashboard, Xbox Damn Small Linux, Hard Drive Unlocking, EEP Rom tools:
Use my link
[DTGFMX360] Microsoft Xbox 360
This type of game is similar to Xbox games, the basic structure is fake TOC (Table of Contents).
So your normal dvd drive won't read the game, unless you trick it.
Currently up to day is the Ixtreme 1.6 firmware, this is for your Xbox 360 DVD drive to read dumped games.
I won't write info on how to flash the Xbox 360 DVD drive as there are many different types.
4 drives are currently available with different revisions, Samsung, Hitachi, Benq and Lite-on.
So you should google on your drive, and see what is required, if your lucky you don't need a huge shopping list, if not. Prepare the cash.
Currently you need a dual layer DVD+R to burn the games on.
So I recommend the Verbatim DVD+R DL 8x version.
This version has been proven on benchmarks to nearly match the results you expect with a single layer disk, so its impressive.
To read the backups you need an Ixtreme Firmware flashed to your Xbox 360's DVD drive or an Xbox 360 modchip.
To backup the game you can use 4 methods:
1. Xbox 360 DVD drive (Samsung one only)
2. Samsung DVD drives with Kreon firmware (Few models only)
3. Any DVD drive with the front cover and top cover removed and use Wxripper the swap method. (Cost Effective, but tricky and could blind you).
4. If your game is non-genuine you can just use Imgburn to make a disk image.
I will use the 3rd option as it is cost effective and worked for me.
You will need: Any old DVD drive or burner that works (I used an worn out Lite-on DVD burner that took over 200 burns and 20 reads), Philips head screw driver that matches your screw from the DVD drive. An very big TOC DVD movie disk (I used an original Mr Bean The Ultimate Disaster Movie 7.5 Gb). Wxripper 1.2, Windows Xp X86 (32 Bit). .Net Framework 2.0 or better and finally ABGX.
We want to remove the top halve of the DVD drive, push an copper wire or an very thin stick into the emergency eject hole, its very small on the bottom of the DVD tray. Push in and the DVD tray will come out a bit. Remove the screws which is about 4.
Gently pull out the tray and remove the tray cover's. Using an flat head screw driver yank the clips holding the front cover (usually there is one per side).
Remove the top cover it should come right off.
Take off the magnet which looks like an white circle or an blue one from the top cover (I used my nails to take it out of the seal). Keep the top cover as it will shield you a bit incase you blind yourself.
Put connect the drive to the computer as usual. Before power on put the big movie disk inside the tray and put that magnet on top of the ring and cover the top with the lid.
Now power on the PC.
Boot into OS (recommend Xp SP3 X86).
Run Wxripper and choose get magic number, now go to File/save layout file.
Name it whatever you want, you only need to do this once.
Edit the layout file with notepad.
It should look something like this:
C19408
D1072
D109344
C1783936
J214688
C1783936
J0
What your one will look like is different from this final edited one.
The important bits is to keep the first letters of each line the same as mine.
You manually edit it and save it.
Now click stop drive in Wxripper, the disk should stop spinning.
Take off the lid and the magnet.
Swap the big DVD in the drive with the Xbox 360 game disk.
Put the magnet and lid back in.
Click spin drive and go to file open layout file, open that layout file you just made.
Click start dump and make an name, click ok.
Wait for about 20 minutes.
If either sectors say error or something then you need to check the data layout for that game on the net.
Now you have an RAW image with Random Padding.
You need to use ABGX to patch various things such as security sectors.
Open it and select the game image you dumped.
Click launch and it should say various information about region and stuff.
Wait until it finishes and the security checks pass.
Now for games these days you are likely to use Ixtreme 1.6 as it is the newest and supports 3rd wave video partition.
Burn the patched image using Imgburn, open the .dvd file with Imgburn and choose the disk's rated speed, click burn and wait for 40 minutes for 2.4x disks.
16 minutes for 4x disks and so on.
After it is completed plug in the game into the modified Xbox 360 and start gaming.
Note: Get magic number has been tested and the results are the same before and after the disk swap part.
Layerbreak 1913760 could be set manually if you don't trust Abgx's .dvd file.
Though if you open Abgx's created .dvd file using a notepad you will get the layerbreak information.
Xbox 360 games booting on the HDD:
There is the NXE dashboard which was released in 2008 officially by Microsoft.
Grab it from their site and install it, now you must have a Xbox 360 HDD a 120Gb is recommended as its the max size currently accepted by the Xbox 360.
Though if you fancy a cheap Xbox 360 HDD like a 20 Gb one, you can use the HDD Hackr kit 1.0 which is in my posts.
With that kit you can hack a Western Digital 2.5 Inch SATA drive to work with your console.
Usage once you have everything is straight forward, just plug in the disk and press Y, it will bump a a menu, choose install game to hard drive.
Wait for 30 minutes or so and its done.
Note: the game must still be in the drive for verification to be played, but the drive is obviously quieter so its not running.
You can however use a backup to run the game in conjunction with a Ixtreme firmware, though you shouldn't play online with this.
________________________________________________________________________
[DTGFNGC] Nintendo Gamecube
Most people will wonder why Gamecube games are not readable by conventional DVD drives,
well it is because the data tracks are written backwards from outside to inside of the disk.
So the TOC cannot be recognized.
With this console you can't really get an new one except on sites such as Ebay and it is
likely to be second hand. So I never bought this console, instead I got an Wii.
With this console you got 2 ways of running backups:
1. Modchip
2. Streaming through network using with Phantasy Star Online Game Disc
I'm only covering the first 1 since they are both convenient.
1. Modchip
Buy an modchip and soldier it onto the DVD drive (4 wires)
Recommend Viper GC EXTREME. If your soldiering skills is not so good get an
electrician to install it and provide him the installation diagram. Alternatively get
the modchip seller to install it.
Boot the disk, no swap needed.
Games will have to be mini-dvds as the drive cannot fit an normal DVD.
_________________________________________________________________________
[DTGFNWii]Nintendo Wii
Again this console's data structure is similar to Gamecubes one, so it cannot be read by
your normal DVD drive, unless the drive has an modified firmware. Some LG DVD drives can
be modified however the models are getting rarer.
To dump the game image from a disk use a homebrew application.
Another thing is that the image you dump will be "scrambled" ie encrypted, Raw Dump 2.0
includes unscrambling function.
Now burning an Wii game is very similar to the PS2 ones, just burn using Img Burn or
an dvd imaging software.
With this console you got 3 ways of running backups:
1. Backup Launcher Gamma 0.3
2. Modchip
3. Flatmii
4. Drive Chip
5. SD/USB Loader 1.5
1. Backup Launcher Gamma 0.3
For this you need to do the Bannerbomb exploit, Homebrew Channel (HBC) and
use HBC to install Backup Launcher Gamma 0.3.
Update: System menu 4.0 is capable, you need Homebrew channel 1.02
So you can use Bannerbomb exploit with Hackmii Installer 0.1
The Bannerbomb exploit is new to the exploit family, the only thing you need to have is a SD card.
You can simply run it in a SD card, the catch is its not perfect.
Note: you can also use an program that allows you to play Gamecube backups.
This is done by installation of Homebrew Channel then install the the Gamecube Backup Launcher 0.2 via miospatcher.
Every time you want to run an game load the Backup Launcher Gamma and press A.
2. Modchip
Install an Modchip: Wiikey V2, Wasabi DX or D2PRO.
5-6 wires to soldier.
Insert an game, thats it.
3. Flatmii
This is an new way of playing Wii games, you stream it through USB 2.0 into the Flatmii
which acts like an Wii DVD drive.
No soldiering required, mount it on the Wii DVD drive and plug the data cable through
the motherboard and through the DVD drive.
Launcher the software for it and choose an Image file to stream. Thats it.
Note: also works for Gamecube games.
4. Drive Chip
This is similar to Flatmii as no soldiering is required, you only need to attach the ribbon cable to the Wii DVD drive and to the Wii.
It works the same way as an normal modchip.
To date Wasabi Team has also released their own version of Drive Chip and in most cases it will cost a bit cheaper.
Currently the cheapest version available is Amazekey, almost the half price of Drivekey.
D2SUN team is working on a 16 Gb NAND flash that can be used to stored and run games, console opening is required.
Uncommon console bugs:
If you have a Mii channel for example that says you can't run it.
This is because you have another region's channel or channels installed.
To fix this use "Anytitle Deleter" its a homebrew application.
For example, my problem was Korean Wii console modified with US menu 3.2 and the person that did it didn't do a good job, as the Korean channels are still there.
So I deleted any file with K in the end of the lists, rebooted 2 times then my console's default channels were fixed.
Your console could be US version or Euro version so it will be E or U on the lists.
5. SD/USB Loader 1.5
Using this application you can install games onto a USB drive or HDD or SD card and boot it there.
Search my posts to find this.
To install this you still need homebrew channel, so a software exploit is still required.
Homebrew side of Wii:
What is a DOL file?
A DOL file is a program designed for the wii by programmers, DOL's can be runned via Homebrew Channel or Bannerbomb.
What is a WAD file?
A WAD file is similar to a DOL file except you have to install it and have a IOS choosen.
So a WAD file can be a install program for a channel. To boot a WAD you use WAD Manager.
What is a ELF file?
It is once again similar to DOL file, you can run this using 2 ways: Bannerbomb or Homebrew Channel.
Installing Homebrew Channel:
What is it?
This is required to run homebrew on Wii and its fairly straight forward.
It runs executables in .dol or .elf format.
The tricks to using it:
1. The root of your SD card must have a "apps" folder.
2. Inside the "apps" folder you must have each program's own folder.
3. Each program's executable file must be named boot.elf or boot.dol
Requirements:
Wii, wiimote, SD card, Bannerbomb, Hackmii 0.2
The easiest way is to use Bannerbomb.
_________________________________________________________________________
[DTGFNDS] Nintendo Dual Screen(NDS)
With this handheld, use will get roms ranging from 16 Mb to 128 Mb size.
Usually roms are packaged in .nds extension.
First of you can run the games using 2 ways: NDS emulator for PC and NDS (any version) with an third party flash cart.
For PC you use No$GBA as it seems to be able to run it at full speed.
For an NDS, you use one of the popular flash carts:
M3DS Real, R4, TTDS (DSTT), Acecard 2.
With newer DSi's you use TTDSi or Acecard 2i.
So the list of equipment are: flash cart, micro SD memory card.
Most flash carts you buy will be empty, so you have to put in an menu.
I recommend the TTDS Flashcart as it is very cost effective.
I don't recommend R4 as it has poor springs on the cart which could render it defective after an lots of inserts and removes.
Another thing about micro SD cards is that there are currently 2 types: normal and SDHC, SDHC is the newer one and comes from 4 Gb and onwards.
Normal ones are 2 Gb and lower.
The difference between the 2 is that the newer one is cheaper and has higher sizes however it seems slower to load compared to older ones.
Older flash carts don't support SDHC micro SD memory cards, so check before you buy.
An good idea for roms is that you can use tools such as NDSTokyoTrim to reduce the rom size by removing dummy data in it.
Generally its straight forward to run an rom as the third party flash carts are programed to make rom running easier, so you can just put the rom file anywhere in the micro SD card and it will run once you boot the menu and select it.
________________________________________________________________________
[DTGFCP] List of common copy protections
Now there are many different types of copy protections. So I'll just list the ones
that are from common to uncommon and you need to know to understand how far
they can go.
StarForce: This has been around for awhile and is one of the tricky ones around,
with this protection you will get virtual drive blacklisting, Rootkits installed and
sometimes if you are intending to run an game using an virtual drive, you must use an program such as Starforce Nightmare which is risky if you don't
know how to use it. Or un-plug your all of your optical drives. According to information from various sources, this protection is one of the hardest ever made, an game called Splinter Cell: Chaos Theory took 1 year and 57 days to crack. An company that very commonly use this CP is Ubisoft.
SafeDisc: This is developed by Macrovision and is very popular with games before 2007, like with some other CP software, it installs its own drivers hidden to the user which is proven to cause security holes for the host OS which is very likely to be Windows XP.
This issue is fixed under Windows Vista. The concept is very basic, even with newer
revisions, so this CP has been discontinued of its use.
SecuROM: This is developed by Sony and is very poplular these days, almost 80%
of the new games use this protection. One of the popular game companies is Electronic Arts (EA).
Since version 7, they can integrate custom checks and activation,
however an No DVD Fixed Exe can bypass it.
Solidshield: This is an average copy protection with the addition of online and offline activation. Mostly used in 2007 games.
SmartE: This is an straight forward copy protection that was used during 2005, an game that has it will be Age of Empires 3, and it was possible to make an 1:1 backup but you will not know when an publisher will terminate your process.
This protection has been discontinued.
TAGES: This was one of the first complex copy protections as it wasn't the same as other ones, which was just encrypted keys. This one was unique at that time since it was customizable. Dummy data, secured keys.
This is one of the copy protections of all times to be reverse engineered slowly. Easier copy protection took weeks to a few months. This one took a few years.
Ring Protect: This is not very common these days, it is used physically on the
disk so it can be seen on the recording side of the disk. You will see some rings
around some parts of the disk, this causes the laser to not read properly and is
very similar to bad sectors.
It is very common on Playstation 2 Swap Magic Disks and cannot be duplicated
by normal methods.
FADE: This is one of the most annoying copy protections ever created.
It goes like this, firstly it makes you think that you can run the game,
secondly it checks the disk to see if it is geniune during some stage of your gaming.
And finally if it detects the game as an pirated version, then you got
the gameplay screwed up, such as bullets missing the target,
tanks driving on ice, and soldiers sinking to the ground.
The good news is that it was only used in one game which is Operation Flashpoint.
Libcrypt:This is used in Sony Playstation (PS) games from approximately
1997 and onwards. It is an fairly simple protection which has the usual LBA
tables and an 2 stage check.
Firstly it checks an 16 bit code in the subchannel followed by an Checksum check which could be anytime during gameplay.
Still we can't make an 1:1 backup since our reader and writer is not capable with it.
Standard methods:
LBA Tables: This is used in almost all of the games, as it tells the game that if the files on the disk is positioned correctly. When you open a retail game image inside Ultra Iso, it will show you its LBA positions of each file.
Encrypted keys: This is used in almost every game to check weither the disk your running is geniune, mostly before running the game or during some stages of the game.
Dummy Files: This is used to bump up the game size, which can be obvious once you compared the full installation of the game with the images of the game. This is used in many games regardless of platforms.
_________________________________________________________________________
[DTGFGT] General Tips
Normally you want less headaches from backuping media or burning them.
I got some handy and straight forward tips to avoid going to the computer shop or whatever to get another set of hardware or blank media.
1. Always use big brands such as Taiyo Yuden, Verbatim, Hitachi Maxell for blank media.
Avoid Princo's, Moser Baer, Excell, Hyena, DSE, Sony Code.
Verbatim has an tougher quality check, even though their media is sometimes made by Moser Baer or CMC
Magnetics, this is called outsourcing.
Imation is not mentioned in recommended disks because according to many benchmarks from Kprobe,
the average burn quality is not top notch.
Verbatim is still the best buy since Taiyo Yuden and Hitachi Maxell is hard to buy and is very expensive.
I still must stress that Verbatim Silver Printable's are horrible as the top layer can be scratched off using an finger nail, so check it wisely.
You can however use cheap disks to try out something and once you are sure its working you do another burn with the better disk.
2. Never let it take sunlight, this is a requirement because sunlight has energy from various sorts of frequencies and wavelengths. This is bad since the dyes used in your conventional blank media is unstable.
3. Never use an burner that has burned over 200 disks to burn backups for consoles or an drive that has been used for more than 1 year with frequent usage.
4. Check a disk's burn quality with Nero CD/DVD Speed or Kprobe or DVD Infopro after burning and after some time.
The common scan speed is 4x CLV.
ECMA specifies that every 8 sectors shouldn't have over 280 PI errors.
PIF errors shouldn't exceed 2.
5. Never put heavy items of any sort on the disk, this is used to prevent scratches and disk warping.
6. Use soft sleeved pouches and if possible use cases.
7. Use Isopropyl Alcohol bought from the Chemist to clean the optical drive's laser lens with an cotton bud and rub it gently, oil the arms of the laser pickup using machine oil or my favorite chemical, Vaseline.
Be sure to clean it off using methylated spirits.
8. If the drive is doesn't have warrenty left and the laser doesn't read the disk well you can try the laser pot
adjustment.
Next to the PCB of the laser you have an screw that is seated to a cup sort of thing.
For DVD drives there will be 2 and for CD drives there is one.
Grab an Multimeter and do some readings first, touch the one connector on the screw and one on the base.
Tweak the pot clockwise 15 degrees and test. Repeat if required.
If it still doesn't work then one of the chips on the drive is screwed so forget it.
9. Never attempt to repair the disk from scratches either yourself or letting someone else do it.
Disks can be unbalanced and scratch removal is not worth it, since they are polishing an layer off the surface.
10. Use the media's rated burn speed and never use slow speeds, CLV is an older write strategy and is usually used on slower speeds. CAV ranges from 12x to 20x.
11. DVD burners are very flexible at almost every blank media make sure you have an burner that is rated 22x or
faster to ensure you have the companies support for future firmware updates.
12. Update your firmware with an newer one according to your model of burner, this helps some improvements to
some disk's, such as speed, quality. This is risk free as I flashed many drives and never had an bricking situation.
13. Avoid Lightscribe or Secure Disk. Your burner has enough bells and whistles, like it or not you are likely to be
throwing away the disks after awhile.
CLV, CAV, Z-CLV, best for most reliable burn?
CD recording was based solely on CLV technology until 16x recording speed, at which speed the rotational speed at the inner track reaches 8,640RPM.
Laser and the chemical dye was capable of accepting higher linear velocity, but increasing the spindle speed much above ~9,000 RPM would make vibration management and tracking difficult. The next generation was based on Z-CLV technology which starts at 16x recording speed and increase speed in steps. In each step, recording speed is kept constant and a graph of the recording speed would look like a stairway. This seems to be the most common recording stragegy in modern recorders.
There are some recorders using CAV (constant angular velocity) writing method which is based on constant spindle speed and varying writing speed as the laser moves across the radius.
Which writing method produces the highest quality burns if any consistent difference between the methods?
I can name pros and cons for each method, but I do not know how they actually interect with writing quality.
Pros:
CLV: The laser sees the disc moving at the same linear speed (m/s) throughout the whole recording session therefore the interection between the dye and the laser is consistent.
Z-CLV: Permits higher speed than 16x
CAV: Spindle speed is kept constant while the write speed constantly changes. Constant spindle speed can keep the vibration amplitude and frequency constant.
Cons:
CLV: varying RPM will cause the disc to vibrate at different amplitude and frequency as RPM approaches and drifts away from the natural resonance of the disc which could theoretically effect write quality
Z-CLV: Because the laser must change power each time the write speed is in changed and the data flow stopped while the speed is being changed, consistent burn may not be guanrateed and there maybe a seem at transition process which may become an issue when you burn a pre-master disc.
CAV: The interection between organic dye and laser can't be predicted exactly as the linear velocity and laser power must be changed continuously.
Overall CAV speeds are more favorable for lower errors.
For single layer DVD it ranges from 16x and higher.
For CD it ranges from 40x and higher.
Video region standards:
This is for consoles, if the region doesn't match the TV's one the game will be black and white on the TV.
The fix for this is to try out your TV and figure it out what I can't output.
Afterwards look at your console's mod type, some modchips allow a GUI to be loaded and you can change the region settings there.
This can also be done with some homebrew software.
Some games allow video region to be changed during bootup.
If you can't change you can buy a special type of video switcher, I don't know the exact name.
__________________________________________________________________________________________
[DCO] Overclocking
This is my favourite part of computer hardware, its a mixed bag whether it will work for you.
What is Overclocking?
Overclocking is a dubbed term for making an computer component work at a higher clock rate than its rated one.
What are the benefits of Overclocking?
Benefits are not really much unless you are into really hardware intensive programs.
For instance you do video editing or gaming, you are likely to see about 20% improvement in performance, in video editing you will notice that it will take 20% shorter time to encode that video.
In gaming for instance you will see about 20% increase in frame rates.
What can you Overclock?
Earliest attempts since the beginning in overclocking, the CPU was the primary intention.
So you can overclock the: CPU, Memory, Video Card Clockspeed, Video Card Memory Clockspeed.
You can also overclock the PCI Express Clock, however benchmarks currently prove it isn't worth it as you don't even see a little improvement in performance. Other than that it kills stability.
What are the requirements of Overclocking?
A CPU that has a good overclocking potential.
A Motherboard that has a good overclocking potential.
What are the risks of Overclocking?
The worst case scenario is a CPU will die in a few months, this could be 2 reasons: overheating and overvolting.
What is recommended for Overclocking?
Usually you would use desktops for this adjustment as laptops will have heat management issues.
Since on laptops you can't really change the cooling setup.
So the first key ingredient is a good cooling system.
A general rule is to look at reviews on the net for a specific cooler that you can get. Tomshardware is a good place, so are Xbitlabs etc.
Electrical components usually have a tolerance of +- 10% in voltage.
So if you don't exceed the limitations, you will get a decent lifespan in your component.
Still if you manage your cooling and voltages, you will get 3-5 years or even more working years.
What type of cooling methods are good?
From best cooling power to worst cooling power:
LHe (Liquid Helium)
LN2 (Liquid Nitrogen)
Dry Ice (Carbon Dioxide in solid form)
Phase Change (Refrigerator)
Peltier (Hot source and cold source)
Water Cooling
Ionic Wind
Air
Passive
LN2 is usually done by placing a cup directly ontop of a CPU, since if you laid the motherboard flat on the table, it will seem impossible to cool the video card since its vertically aligned.
Usually the water molecules in the air will freeze in the surroundings of the cooler, so you have to insulate the motherboard's components to avoid shorting out the tracks.
Overclockers often use electrical tape or insulating putty to combat this.
So a verdict on this is that it is only good for overclocking tournaments or
some guys that just want to set some records.
As liquid nitrogen boils off at very low temps, a constant supply is required.
And since liquid nitrogen is very cold, it can be very dangerous if not handled properly.
Dry Ice isn't as effective as liquid nitrogen however it is easier and more safer to use, the same problem occurs however and that is a constant supply is required for normal use.
Since every motherboard is different, I'll give the general idea.
CPU overclocking:
First of you can do this many ways.
Before Bios overclocking is made, people had to use jumpers to overclock their processors.
Nowadays you can use Bios, motherboard OEM's tool such as Easy Tune from Gigabyte, Asus's AI Booster etc.
Or for AMD Phenom users you can use AMD Overdrive.
I'll cover the Bios overclocking method as it gives you more control over your overclock which most programs don't offer.
There are 2 ways of overclocking the CPU, the Bus overclock and the Multiplier overclock or a combination of both.
Since most CPU's have their Multiplier locked, Bus overclocking is required.
Pros of Bus overclocking:
We get the best bandwidth across every major component.
All decent CPU's can have their Bus's overclocked.
Cons of Bus overclocking:
Memory frequency raises alongside the Bus.
IDE, AGP Buses etc are raised alongside the Bus.
AMD CPU overclocking:
To this I refer to K8 to K10 CPU's.
To start off you find out your memory speed via CPU-Z.
400Mhz gives DDR2 800, 533Mhz gives DDR 2 1066 etc.
There are various memory around ranging from DDR, DDR 2 and DDR 3.
DDR is essentially phased out shown by the increase in memory price and DDR 2 is phasing out very soon.
You can overclock the memory however its often tricky since you have to get the timings right to get the best result and this takes time.
So I'll cover the memory divider method, since your CPU's bus is overclocked, your memory is overclocked as well as its linked.
What is the Memory Divider method?
When your CPU Bus is overclocked, the memory frequency raises which can cause stability issues.
So increasing the memory ratio or in some Bioses you decrease the memory speed.
So by decreasing the memory speed, you can make your CPU's Bus run faster without worrying about timings for the memory or clockspeed of the memory.
Now you find out what is your Hypertransport frequency which can be done in CPU-Z as well.
Check your CPU's clockspeed, if it changes by plenty of Mhz, say for 200 or greater, that means your CPU's power saving function is on.
By AMD it will be Coolin Quiet.
Now its a good idea to turn it off to get a reading on what your CPU's default clockspeed is and other values such as Hypertransport frequency and CPU voltage.
Now head into the Bios, for most motherboards it will be DEL key or on some F2 or can be anything.
Refer to the motherboard's manual which can be found on the OEM's website.
For my example, I'll refer to common the Phoenix Bio menu.
Head into Advanced Chipset features.
Turn off every CPU feature except for SSE2 instructions or any SSSE named function.
Push ESC.
Head into Frequency/Voltage control.
Drop the Hypertransport frequency down a bit if available.
Drop the memory divider to 333 etc if yours is 400 on default.
Increase CPU frequency to 230Mhz etc.
Raise CPU voltage by 5% from the default.
Boot into Windows and run a 4 hour Benchmark with Prime 95 with 8x8 setting.
If no errors are detected, go back to the Bios and repeat the CPU manipulation steps.
Note: if your computer locks up during booting, reset the Bios, this can be done via jumpers, refer to the manual.
Or it can be done using the CMOS battery removal which is just the single battery on the motherboard.
Incomplete 0.47 version.
Most of the commonly used ones will be added.
Due to scarcity of older models of consoles, some will not be added since I can't buy one on my country's local network.
If you need one that is not up there, post an request.
Most of the booting methods Ive tested them myself to confirm that they are working, some I took off from other sourced guides.
If an newer method is available I will try to put it in.
More to come and will be revised. Feedback is welcome.
If a modchip solution is available, it will be listed in the contents for each console.
A modchip simply makes game running easier since you don't require much hassle, the console just works exactly like what it normally does except you removed most limitations.
1/8/2009
The hardware I'll be using are:
Xbox with motherboard revision 1.6 with a Duo X2 GS Modchip.
Xbox 360 Falcon revision with a Lite-On DVD drive flashed with Ixtreme 1.5
PS2 90002 series with Swap Magic 3.6
Wii Korean model with D2E drive epoxy, System Menu 3.2U and softmodded with Bannerbomb.
AMD Athlon X2 5000+ with Deepcool Buffalo cooler.
Asus M2N68
Hynix DDR 2 800 2Gb x4
Asus AMD HD4850 Matrix 512Mb
Enermax Liberty 620W
Cooler Master Centurion 5
________________________________________________________________________
Contents:
0. Introduction_________________[DTGFI]
1. PC games___________________[DTGFPC]
2. Sony Playstation (PSX)________[DTGFSP] Modchip
3. Sony Playstation 2 (PS2)_______[DTGFSP2] Modchip
4. Sony Playstation Portable (PSP) credit goes to The-Punisher
- Code:
http://warezme.org/viewtopic.php?f=29&t=5177
5. Microsoft Xbox_______________[DTGFMX] Modchip
6. Microsoft Xbox 360____________[DTGFMX360]
7. Nintendo Gamecube___________[DTGFNGC] Modchip
8. Nintendo Wii_________________[DTGFNWii] Modchip
9. Nintendo Dual Screen (NDS)____[DTGFNDS]
10. List of common copy protections_[DTGFCP]
11. General tips__________________[DTGFGT]
12. Overclocking__________________[DCO]
________________________________________________________________________
[DTGFI] Introduction
Why did I write this guide?
Most users will be quite new on some parts of the gaming world.
Sometimes we need information fast, because we are not very patient.
I was bored and the forum needed one.
I wanted to improve this forum and I like to help people.
How to use this guide?
I made it easier to browse it. So look up the console you want to use.
Use the short cuts I have listed under here.
Highlight the code in the big brackets and Control C.
Control F and in that box Control V. Click find and Voila.
This is best used under Firefox 3.5 as you can enlarge it or decrease the size.
So what about some rough edges?
Not everything will be as it seems.
I might have missed some bits or the names could be something else.
Its reality.
Some copy protection I will refer as CP, will sometimes make running some
games more trickier.
What is mostly involved?
Well for the starters you need to download every part of an compressed
archive. Commonly they use Winrar (.rar) or 7-Zip (.7z)
Most of the cases just put them in one folder and extract the first one.
Type the password if required.
Some archives such as Winrar ones you have to extract not the first one,
but the .rar one.
Remember compare all the archives with the result file. If one thing is odd,
its a good idea to check again.
For consoles, if your going to Modchip you have to buy that chip and hope someone will install it for you, if not you have to get soldiering equipment and DIY.
On Xbox 360 its again unavoidable to purchase extra hardware, however if you going to pay a little extra, you don't need soldiering equipment, however some parts are needed if your going to flash the drive yourself.
_______________________________________________________________________
[DTGFPC] PC games
For games on Windows, its a good idea to check for video card driver updates from Nvidia or ATI, according to your video card.
With this your looking generally at Rips, direct Image dumps or the new Steam versions.
Firstly Rips:
Rips are ones that had the Movie's called CGI's and sometimes Music is removed too.
It is used because it saves space and bandwidth for some users.
Usually an instruction is included.
If not look for an obvious launcher, usually called setup.exe. Install.bin
Most are compressed in an archive that looks like an DOS window.
It takes awhile to extract.
Remember most games require an registry entry so you might need to run an registry file,
usually called Registry.reg etc.
So generally your looking for an .reg extension.
Sometimes an Direct X update is required and generally these don't provide it.
Commonly these days Direct X 9.0c is alright for most games.
Of course for Vista, Direct X 10.1 is a good idea for your OS.
Secondly Direct Image Dumps:
Direct image dump's are those games that is near perfect of the original retail disk.
You will often get .iso, .mdf/mds, .ccd/img/cue, .bin/cue, .nrg etc.
For this you need Daemon Tools or Alcohol 120% which are the commonly used
virtual drive emulators.
They are very straight forward and just need you to mount the image with it.
In Alcohol you just right click on the virtual drive on the bottom of the window usually
called SCSIVAX and select mount then find and double click the image file.
Note: the image file is usually in an extension such as: .iso, ccd-sub-cue, bin-cue, mdf-mds and such.
In Daemon Tools just open it and there will be a lighting bolt thing on the right hand
side of the desktop. Right click on that and select Emulation- all options on.
After right click on the lighting bolt thing again which is green now,
this time that select Virtual CD\DVD Drive and select the set number of devices- 1 to
4 depending on your needs. Lastly left click on the lighting bold thing and select
mount since there is only one option. Choose the image file.
Install the game as usual.
Newer games tend to have virtual drive blacklisting so you have to use a tool
such as Starforce nightmare, safe disk 4 hider etc. Play with them yourself
to get the hang of it.
Note: Starforce Nightmare is complex in someway and you can brick your
physical device nodes which is bad.
Most games are not 1:1 dumps which means they can't fool the copy protection checks.
The reason for that is because it takes over 4 hours to dump an 1:1
image and it has low chance of success.
While an decent image will take 20 minutes per DVD and 5 minutes per CD.
So if its not an 1:1 dump you will need an No CD fixed exe commonly
referred as No CD Patch, this is wrong.
Get an No CD fixed exe from Gameburnworld or Gamecopyworld's game fixes.
You must know which version the game is in, if its an direct image dump
its usually 1.0
Get that file and overwrite the original exe from the installation folder
that you specified when you installed the game.
Done and make sure you keep that image file for future usage as
you might need to reinstall your OS which will delete every registry entry.
The thing that is good about Direct Image Dumps is that you can update it,
on default it has an virgin exe.
So when your updating from 1.0 to another version,
replace the fixed exe with the virgin exe.
Update it and replace the updated virgin exe with the fixed one
corresponding with the version you updated it to.
Harder example of CP:
Now there is one more trick like with the newer Custom Securom 7 versions.
Sometimes you don't just replace the exe or replace an .dll file eg.
Paul.dll which is used in Custom Securom 7.
With that being said some games like Bioshock has those Securom 7
bundled with activation checks using an online server, it depends on your
luck. With Bioshock this server check is right after installation.
Now you can delay it by unplugging the Ethernet cable. But the bad thing
is about timing, it deletes the installation and you have to start again.
So you have to bypass that by making another folder, copy the name from
the installed one to the currently made one.
So the trick here is right after you install it with the Ethernet cable unplugged,
don't do anything on the installer.
Now with the installation folder rename it to Bioshock 2, now create another
folder called Bioshock.
Now click next and it will delete the dummy installation folder.
Now you must run the .reg file and overwrite the edited paul.dll with the
virgin one. Done
Bioshock method 2 fast: right after it asks you to insert the original disk during the last part of the installation, kill the process in Task Manager/processes and under description it should only have setup.
The name will have an _ in the line.
Afterwards click okay and the Bioshock folder will remain with the files on the installation directory you requested.
Easier example of CP:
Now an easier example of an Custom Securom 7 will be the game Crysis
Warhead. This game is easier since the activation check is the first time
you run the game.
So there is no timing involved, just before you run the game replace the
virgin .dll with the edited one. Done
Steam type games are pretty straight forward and are very similar to Rips,
they provide an installer and instructions.
_________________________________________________________________________
[DTGFSP] Sony Playstation
With this type of console game, it has to be direct image dumps, 1:1 dumps are not possible.
So to backup an PS game you need an cd reader or better, with Clone CD.
The interface is straight forward so just use the game cd setting and change the audio read speed to slow since its Mode 2 XA data type there isn't much ECC (Error Correction Code).
History of Playstation backups:
Originally backups were created using CDRWin but now its an outdated program that just supports CDs.
CDRWin was a great program originally since it has Cue sheets. Nowadays Nero can do it too.
Running an backup is achieved by many methods:
1. Action Replay, Gameshark or Breaker Pro which is the method without soldiering anything to the motherboard, but require you to swap disks.
2. Use an game enhancer which is just plugging in the slot in left of the back side of the console.
_________________________________________________________________________
[DTGFSP2] Sony Playstation 2
With this type of console game it is very straight forward, many programs will make an
decent direct dumps, again 1:1 dumps are not possible because we can't print an laser etched barcode
near the ring of the disk.
So to backup the DVD game use Ultra Iso's Make CD/DVD image's function. Use any speed and start
dumping. Normal DVD's (DVD5) that are in perfect conditions should take less than 10 minutes.
Dual Layer DVD's (DVD9) that are in perfect conditions should take about 20 minutes.
CD games are tricky and you need Clone CD with modified settings.
To burn an PS2 DVD game just use Ultra Iso's Burn Image, chose the dumped image and set an speed.
Usually use the speed rated on the disk. Slow speeds won't make the burn quality better since faster speeds
usually use CAV (Constant Angular Velocity) and slow speeds use CLV (Constant Linear Velocity).
All PS2 DVD games can be dumped and burnt using most dvd imaging programs.
Booting an game:
To start an PS2 game you can use 8 methods:
PS2 Playstation driver exploit (requires a original PS game)
Action Replay/ Codebreaker/ Gameshark disk (requires original one)
ESR via FMCB 1.8 (requires a method to install FMCB)
Memento 32 Memory Card
Datel 64MB memory card (AKA Gate crusher)
Swap Magic Disk (requires original one)
HD Loader/ HD Advanced
USB Extreme
Swap Magic Method:
Boot the Swap Magic disk, when the splash screen shows
For old models SCPH 1x00x-5x00x use an credit card with an hole cut in the top of the rectangle on the shortest side. Cut of the size of an hole punch.
Now take off the front cover of the PS2's DVD tray, look at it carefully before you take it off, it should come off with minimal force.
Look for an silver pin, it should be between the left to the center of the tray.
Slide the card inside the console, grip the pin with the hole and slide it to the right. The DVD tray will be loose, using minimal force pull the tray out and swap disks.
Push the tray back in and slide the pin left with the card.
Tap X on the controller and the game will boot.
Alternatively use flip tops V4-V10 PS2 consoles.
For PS2 models 7x00x models you have to use the magic tools V3 which is easier to swap disk's once installed or use an flip top designed for slim PS2s. Or you could block the lasers manually by opening the console.
For PS2 models 9x00x series, you have to use Modchip or Swap Magic Disks with Magic tools V4 since the DVD driver exploit has been fixed, so Memento 32, PS game exploit and free MCB won't work.
Since a cheatdisk is also a valid game like program, you can also use a cheatdisk and block the sensor 1.
From the above diagram for SCPH-7x00x series PS2, block all 3 sensors, I prefer using a non metallic stick, so I use a piece from a cotton bud, cut out one of the sides that has the cotton bud, move sensor 2 to the right push it into sensor 2's left hand side as deep as you can get, cut out the remaining bits.
The reason I use this for sensor 2 is because the Magic Keys have a disk scratching problem for sensor 2's key.
For 9x00x series PS2, blocking sensor 1 is the only requirement.
Memento 32 Method:
Your games must be patched with the included patcher before this, otherwise it won't work.
Power on the PS2, put the patched disk in (you have 10 seconds before it boots the default ps2 OS).
The screen will stay blank for about 20 seconds as it boots without the Playstation 2 Logo.
Thats it.
HD Loader/ HD Advanced:
Must have the PS2 network adaptor V3-V10 (SCPH-3x00x to 5x00x)
Must have HD Combo or a homemade PS2 IDE adaptor V12/V13 (SCPH-7000x)
IDE hard disk, for older HD Loader versions don't have 48bit LBA so you can only read 137 Gb of any hard disk. HDL 0.8c has 48bit LBA.
One of the original disks or you can just use a hacked ELF or using a backup via modchip.
_________________________________________________________________________
[DTGFPSP] Sony Playstation Portable (PSP)
I can't provide much on these, I haven't got too much time to do research and I don't have a console with me so I can't experiment.
From this date, PSP model 3000 series can only run homebrew, that excludes running image backups of games.
Currently official Sony PSP firmware is 5.51.
Currently the only newest custom PSP firmware that has a updated kernel is the 5.50 GEN firmware,
this firmware can run homebrew and image backups of games.
_________________________________________________________________________
[DTGFMX] Microsoft Xbox
This is currently the most annoying type of console to dump its games.
Do not attempt this unless you have plenty of patience and can waste some DVD's.
Success rate is low and is heavily dependent on what FTP program you dump your games and patch your xbe's with.
The process is annoying to begin with, you have to FTP your Xbox to your PC.
Either crossover cable or with router.
This method is done using crossover cable (CAT6) directly with computer.
How to dump original Xbox games:
You will need:
Craxtion 4(Maybe buggy)
Clone XB v2.3 Beta
Windows XP Professional SP3 (recommended)
Xbox Media Centre Dashboard or Evolution X (recommended)
Crossover cable (CAT6)
In dashboard:
1. Set IP to 192.168.0.3
Set Subnetmask to 255.255.255.0
Set Default gateway to 192.168.0.4
2. Disable Xbox game autoboot.
3. You must leave it in the dashboard to dump your games.
In windows:
1. Open Network Connections under Control Panel.
2. Open Local Area Connection using right click and click properties.
3. scroll down to Internet Protocol (TCP/IP).
4. Click on that and click properties.
5. Click use the following IP address:
6. Fill out the details I used:
IP address: 192.168.0.4,
Subnet mask: 255.255.255.0
Default gateway: 192.168.0.4
Important: you must remember the factory IP settings.
7. Save the options.
8. To check if correct use Start/Run, type CMD and use ipconfig command.
9. Open Craxtion and double click on Xbox.
10. Set IP to 192.168.0.3
Set Subnet mask to 255.255.255.0
11. Click connect and hope it shows the partitions.
12. Insert the Xbox game into the Xbox and start Disk Ripper Wizard in
Craxtion.
13. Create a folder which you want to rip to and start ripping.
14. Now open CloneXB v2.3 Beta.
15. Under PC settings, choose your desired folder to save the compiled image.
16. Click the second button on the bottom.
17. Choose the folder that you dumped the game files and wait until it finishes creating your image.
18. Burn the disk image to a DVD-R.
Note: if the game is too big remove these files in the root directory:
dashupdate.xbe,update.xbe,downloader.xbe. They are safe to remove.
Some games have dummy data, remove these to save space, use a hex editor to check the file individually, some are obvious.
1kb the dummy files using a renamed text pad with a space in its contents.
If CloneXB fails to startup run it in Windows 2000 capability.
I used 2 programs which can do the same thing since both programs gave me some issues. Craxtion is terrible at compiling images.
Notes: Vista might work, but is a bit harder to configure.
If you want to rip a different game, its a good idea to disconnect by clicking on the xbox in windows, as FTP information doesn't get updated.
Remember to change IP in your windows back to default IP settings otherwise you will not be able to connect to the internet.
Burning the game is straight forward use Imgburn's write disk function and use a DVD-R disk.
The 80 conductor IDE cable mod:
By swapping the old 40 pin IDE cable to a 80 pin one, you can see over 20% increase in HDD performance from the Xbox, as the Xbox is capable of ATA 100 transfer speeds, its limited by a ATA 66 IDE cable.
This is because Microsoft tries to save money per Xbox and its a common sense to do that.
Tools required:
A set of Torx screw drivers, (Recommend Talismoon Moonlight set)
80 Conductor IDE cable ATA 100 or ATA 133
Xbox
patience.
Take your Xbox apart, Flip it upside down.
Remove 6 Torx 20 screws, 4 is under those rubber feet and 2 is under 2 stickers.
Flip it back up and lift off the lid.
Now comes the tricky part, you must take off 1 screw to remove the HDD rack and in the process try to lift the rack not wiggle it around inside the case as this might bend some capacitors.
Disconnect the IDE cable and 4 pin molex.
Use a permanent marker to mark the little yellow DVD cable.
Remove another 2 screws to remove the DVD drive.
Remove the DVD drive.
Now you have the IDE port exposed, look at the cable and connect accordingly, do not fold it like the factory one as it has a high chance of not being long enough.
As mine was shorter than the factory one, I had to bend the cables a bit accordingly and tied some electrical tape to avoid the screws being screwed into the cable.
Reconnect cables and attach the console back, if everything goes well you should be able to boot up without service errors.
Installing a custom dashboard, Xbox Damn Small Linux, Hard Drive Unlocking, EEP Rom tools:
Use my link
- Code:
http://www.warez-bb.org/viewtopic.php?t=2678151&highlight=
[DTGFMX360] Microsoft Xbox 360
This type of game is similar to Xbox games, the basic structure is fake TOC (Table of Contents).
So your normal dvd drive won't read the game, unless you trick it.
Currently up to day is the Ixtreme 1.6 firmware, this is for your Xbox 360 DVD drive to read dumped games.
I won't write info on how to flash the Xbox 360 DVD drive as there are many different types.
4 drives are currently available with different revisions, Samsung, Hitachi, Benq and Lite-on.
So you should google on your drive, and see what is required, if your lucky you don't need a huge shopping list, if not. Prepare the cash.
Currently you need a dual layer DVD+R to burn the games on.
So I recommend the Verbatim DVD+R DL 8x version.
This version has been proven on benchmarks to nearly match the results you expect with a single layer disk, so its impressive.
To read the backups you need an Ixtreme Firmware flashed to your Xbox 360's DVD drive or an Xbox 360 modchip.
To backup the game you can use 4 methods:
1. Xbox 360 DVD drive (Samsung one only)
2. Samsung DVD drives with Kreon firmware (Few models only)
3. Any DVD drive with the front cover and top cover removed and use Wxripper the swap method. (Cost Effective, but tricky and could blind you).
4. If your game is non-genuine you can just use Imgburn to make a disk image.
I will use the 3rd option as it is cost effective and worked for me.
You will need: Any old DVD drive or burner that works (I used an worn out Lite-on DVD burner that took over 200 burns and 20 reads), Philips head screw driver that matches your screw from the DVD drive. An very big TOC DVD movie disk (I used an original Mr Bean The Ultimate Disaster Movie 7.5 Gb). Wxripper 1.2, Windows Xp X86 (32 Bit). .Net Framework 2.0 or better and finally ABGX.
We want to remove the top halve of the DVD drive, push an copper wire or an very thin stick into the emergency eject hole, its very small on the bottom of the DVD tray. Push in and the DVD tray will come out a bit. Remove the screws which is about 4.
Gently pull out the tray and remove the tray cover's. Using an flat head screw driver yank the clips holding the front cover (usually there is one per side).
Remove the top cover it should come right off.
Take off the magnet which looks like an white circle or an blue one from the top cover (I used my nails to take it out of the seal). Keep the top cover as it will shield you a bit incase you blind yourself.
Put connect the drive to the computer as usual. Before power on put the big movie disk inside the tray and put that magnet on top of the ring and cover the top with the lid.
Now power on the PC.
Boot into OS (recommend Xp SP3 X86).
Run Wxripper and choose get magic number, now go to File/save layout file.
Name it whatever you want, you only need to do this once.
Edit the layout file with notepad.
It should look something like this:
C19408
D1072
D109344
C1783936
J214688
C1783936
J0
What your one will look like is different from this final edited one.
The important bits is to keep the first letters of each line the same as mine.
You manually edit it and save it.
Now click stop drive in Wxripper, the disk should stop spinning.
Take off the lid and the magnet.
Swap the big DVD in the drive with the Xbox 360 game disk.
Put the magnet and lid back in.
Click spin drive and go to file open layout file, open that layout file you just made.
Click start dump and make an name, click ok.
Wait for about 20 minutes.
If either sectors say error or something then you need to check the data layout for that game on the net.
Now you have an RAW image with Random Padding.
You need to use ABGX to patch various things such as security sectors.
Open it and select the game image you dumped.
Click launch and it should say various information about region and stuff.
Wait until it finishes and the security checks pass.
Now for games these days you are likely to use Ixtreme 1.6 as it is the newest and supports 3rd wave video partition.
Burn the patched image using Imgburn, open the .dvd file with Imgburn and choose the disk's rated speed, click burn and wait for 40 minutes for 2.4x disks.
16 minutes for 4x disks and so on.
After it is completed plug in the game into the modified Xbox 360 and start gaming.
Note: Get magic number has been tested and the results are the same before and after the disk swap part.
Layerbreak 1913760 could be set manually if you don't trust Abgx's .dvd file.
Though if you open Abgx's created .dvd file using a notepad you will get the layerbreak information.
Xbox 360 games booting on the HDD:
There is the NXE dashboard which was released in 2008 officially by Microsoft.
Grab it from their site and install it, now you must have a Xbox 360 HDD a 120Gb is recommended as its the max size currently accepted by the Xbox 360.
Though if you fancy a cheap Xbox 360 HDD like a 20 Gb one, you can use the HDD Hackr kit 1.0 which is in my posts.
With that kit you can hack a Western Digital 2.5 Inch SATA drive to work with your console.
Usage once you have everything is straight forward, just plug in the disk and press Y, it will bump a a menu, choose install game to hard drive.
Wait for 30 minutes or so and its done.
Note: the game must still be in the drive for verification to be played, but the drive is obviously quieter so its not running.
You can however use a backup to run the game in conjunction with a Ixtreme firmware, though you shouldn't play online with this.
________________________________________________________________________
[DTGFNGC] Nintendo Gamecube
Most people will wonder why Gamecube games are not readable by conventional DVD drives,
well it is because the data tracks are written backwards from outside to inside of the disk.
So the TOC cannot be recognized.
With this console you can't really get an new one except on sites such as Ebay and it is
likely to be second hand. So I never bought this console, instead I got an Wii.
With this console you got 2 ways of running backups:
1. Modchip
2. Streaming through network using with Phantasy Star Online Game Disc
I'm only covering the first 1 since they are both convenient.
1. Modchip
Buy an modchip and soldier it onto the DVD drive (4 wires)
Recommend Viper GC EXTREME. If your soldiering skills is not so good get an
electrician to install it and provide him the installation diagram. Alternatively get
the modchip seller to install it.
Boot the disk, no swap needed.
Games will have to be mini-dvds as the drive cannot fit an normal DVD.
_________________________________________________________________________
[DTGFNWii]Nintendo Wii
Again this console's data structure is similar to Gamecubes one, so it cannot be read by
your normal DVD drive, unless the drive has an modified firmware. Some LG DVD drives can
be modified however the models are getting rarer.
To dump the game image from a disk use a homebrew application.
Another thing is that the image you dump will be "scrambled" ie encrypted, Raw Dump 2.0
includes unscrambling function.
Now burning an Wii game is very similar to the PS2 ones, just burn using Img Burn or
an dvd imaging software.
With this console you got 3 ways of running backups:
1. Backup Launcher Gamma 0.3
2. Modchip
3. Flatmii
4. Drive Chip
5. SD/USB Loader 1.5
1. Backup Launcher Gamma 0.3
For this you need to do the Bannerbomb exploit, Homebrew Channel (HBC) and
use HBC to install Backup Launcher Gamma 0.3.
Update: System menu 4.0 is capable, you need Homebrew channel 1.02
So you can use Bannerbomb exploit with Hackmii Installer 0.1
The Bannerbomb exploit is new to the exploit family, the only thing you need to have is a SD card.
You can simply run it in a SD card, the catch is its not perfect.
Note: you can also use an program that allows you to play Gamecube backups.
This is done by installation of Homebrew Channel then install the the Gamecube Backup Launcher 0.2 via miospatcher.
Every time you want to run an game load the Backup Launcher Gamma and press A.
2. Modchip
Install an Modchip: Wiikey V2, Wasabi DX or D2PRO.
5-6 wires to soldier.
Insert an game, thats it.
3. Flatmii
This is an new way of playing Wii games, you stream it through USB 2.0 into the Flatmii
which acts like an Wii DVD drive.
No soldiering required, mount it on the Wii DVD drive and plug the data cable through
the motherboard and through the DVD drive.
Launcher the software for it and choose an Image file to stream. Thats it.
Note: also works for Gamecube games.
4. Drive Chip
This is similar to Flatmii as no soldiering is required, you only need to attach the ribbon cable to the Wii DVD drive and to the Wii.
It works the same way as an normal modchip.
To date Wasabi Team has also released their own version of Drive Chip and in most cases it will cost a bit cheaper.
Currently the cheapest version available is Amazekey, almost the half price of Drivekey.
D2SUN team is working on a 16 Gb NAND flash that can be used to stored and run games, console opening is required.
Uncommon console bugs:
If you have a Mii channel for example that says you can't run it.
This is because you have another region's channel or channels installed.
To fix this use "Anytitle Deleter" its a homebrew application.
For example, my problem was Korean Wii console modified with US menu 3.2 and the person that did it didn't do a good job, as the Korean channels are still there.
So I deleted any file with K in the end of the lists, rebooted 2 times then my console's default channels were fixed.
Your console could be US version or Euro version so it will be E or U on the lists.
5. SD/USB Loader 1.5
Using this application you can install games onto a USB drive or HDD or SD card and boot it there.
Search my posts to find this.
To install this you still need homebrew channel, so a software exploit is still required.
Homebrew side of Wii:
What is a DOL file?
A DOL file is a program designed for the wii by programmers, DOL's can be runned via Homebrew Channel or Bannerbomb.
What is a WAD file?
A WAD file is similar to a DOL file except you have to install it and have a IOS choosen.
So a WAD file can be a install program for a channel. To boot a WAD you use WAD Manager.
What is a ELF file?
It is once again similar to DOL file, you can run this using 2 ways: Bannerbomb or Homebrew Channel.
Installing Homebrew Channel:
What is it?
This is required to run homebrew on Wii and its fairly straight forward.
It runs executables in .dol or .elf format.
The tricks to using it:
1. The root of your SD card must have a "apps" folder.
2. Inside the "apps" folder you must have each program's own folder.
3. Each program's executable file must be named boot.elf or boot.dol
Requirements:
Wii, wiimote, SD card, Bannerbomb, Hackmii 0.2
The easiest way is to use Bannerbomb.
_________________________________________________________________________
[DTGFNDS] Nintendo Dual Screen(NDS)
With this handheld, use will get roms ranging from 16 Mb to 128 Mb size.
Usually roms are packaged in .nds extension.
First of you can run the games using 2 ways: NDS emulator for PC and NDS (any version) with an third party flash cart.
For PC you use No$GBA as it seems to be able to run it at full speed.
For an NDS, you use one of the popular flash carts:
M3DS Real, R4, TTDS (DSTT), Acecard 2.
With newer DSi's you use TTDSi or Acecard 2i.
So the list of equipment are: flash cart, micro SD memory card.
Most flash carts you buy will be empty, so you have to put in an menu.
I recommend the TTDS Flashcart as it is very cost effective.
I don't recommend R4 as it has poor springs on the cart which could render it defective after an lots of inserts and removes.
Another thing about micro SD cards is that there are currently 2 types: normal and SDHC, SDHC is the newer one and comes from 4 Gb and onwards.
Normal ones are 2 Gb and lower.
The difference between the 2 is that the newer one is cheaper and has higher sizes however it seems slower to load compared to older ones.
Older flash carts don't support SDHC micro SD memory cards, so check before you buy.
An good idea for roms is that you can use tools such as NDSTokyoTrim to reduce the rom size by removing dummy data in it.
Generally its straight forward to run an rom as the third party flash carts are programed to make rom running easier, so you can just put the rom file anywhere in the micro SD card and it will run once you boot the menu and select it.
________________________________________________________________________
[DTGFCP] List of common copy protections
Now there are many different types of copy protections. So I'll just list the ones
that are from common to uncommon and you need to know to understand how far
they can go.
StarForce: This has been around for awhile and is one of the tricky ones around,
with this protection you will get virtual drive blacklisting, Rootkits installed and
sometimes if you are intending to run an game using an virtual drive, you must use an program such as Starforce Nightmare which is risky if you don't
know how to use it. Or un-plug your all of your optical drives. According to information from various sources, this protection is one of the hardest ever made, an game called Splinter Cell: Chaos Theory took 1 year and 57 days to crack. An company that very commonly use this CP is Ubisoft.
SafeDisc: This is developed by Macrovision and is very popular with games before 2007, like with some other CP software, it installs its own drivers hidden to the user which is proven to cause security holes for the host OS which is very likely to be Windows XP.
This issue is fixed under Windows Vista. The concept is very basic, even with newer
revisions, so this CP has been discontinued of its use.
SecuROM: This is developed by Sony and is very poplular these days, almost 80%
of the new games use this protection. One of the popular game companies is Electronic Arts (EA).
Since version 7, they can integrate custom checks and activation,
however an No DVD Fixed Exe can bypass it.
Solidshield: This is an average copy protection with the addition of online and offline activation. Mostly used in 2007 games.
SmartE: This is an straight forward copy protection that was used during 2005, an game that has it will be Age of Empires 3, and it was possible to make an 1:1 backup but you will not know when an publisher will terminate your process.
This protection has been discontinued.
TAGES: This was one of the first complex copy protections as it wasn't the same as other ones, which was just encrypted keys. This one was unique at that time since it was customizable. Dummy data, secured keys.
This is one of the copy protections of all times to be reverse engineered slowly. Easier copy protection took weeks to a few months. This one took a few years.
Ring Protect: This is not very common these days, it is used physically on the
disk so it can be seen on the recording side of the disk. You will see some rings
around some parts of the disk, this causes the laser to not read properly and is
very similar to bad sectors.
It is very common on Playstation 2 Swap Magic Disks and cannot be duplicated
by normal methods.
FADE: This is one of the most annoying copy protections ever created.
It goes like this, firstly it makes you think that you can run the game,
secondly it checks the disk to see if it is geniune during some stage of your gaming.
And finally if it detects the game as an pirated version, then you got
the gameplay screwed up, such as bullets missing the target,
tanks driving on ice, and soldiers sinking to the ground.
The good news is that it was only used in one game which is Operation Flashpoint.
Libcrypt:This is used in Sony Playstation (PS) games from approximately
1997 and onwards. It is an fairly simple protection which has the usual LBA
tables and an 2 stage check.
Firstly it checks an 16 bit code in the subchannel followed by an Checksum check which could be anytime during gameplay.
Still we can't make an 1:1 backup since our reader and writer is not capable with it.
Standard methods:
LBA Tables: This is used in almost all of the games, as it tells the game that if the files on the disk is positioned correctly. When you open a retail game image inside Ultra Iso, it will show you its LBA positions of each file.
Encrypted keys: This is used in almost every game to check weither the disk your running is geniune, mostly before running the game or during some stages of the game.
Dummy Files: This is used to bump up the game size, which can be obvious once you compared the full installation of the game with the images of the game. This is used in many games regardless of platforms.
_________________________________________________________________________
[DTGFGT] General Tips
Normally you want less headaches from backuping media or burning them.
I got some handy and straight forward tips to avoid going to the computer shop or whatever to get another set of hardware or blank media.
1. Always use big brands such as Taiyo Yuden, Verbatim, Hitachi Maxell for blank media.
Avoid Princo's, Moser Baer, Excell, Hyena, DSE, Sony Code.
Verbatim has an tougher quality check, even though their media is sometimes made by Moser Baer or CMC
Magnetics, this is called outsourcing.
Imation is not mentioned in recommended disks because according to many benchmarks from Kprobe,
the average burn quality is not top notch.
Verbatim is still the best buy since Taiyo Yuden and Hitachi Maxell is hard to buy and is very expensive.
I still must stress that Verbatim Silver Printable's are horrible as the top layer can be scratched off using an finger nail, so check it wisely.
You can however use cheap disks to try out something and once you are sure its working you do another burn with the better disk.
2. Never let it take sunlight, this is a requirement because sunlight has energy from various sorts of frequencies and wavelengths. This is bad since the dyes used in your conventional blank media is unstable.
3. Never use an burner that has burned over 200 disks to burn backups for consoles or an drive that has been used for more than 1 year with frequent usage.
4. Check a disk's burn quality with Nero CD/DVD Speed or Kprobe or DVD Infopro after burning and after some time.
The common scan speed is 4x CLV.
ECMA specifies that every 8 sectors shouldn't have over 280 PI errors.
PIF errors shouldn't exceed 2.
5. Never put heavy items of any sort on the disk, this is used to prevent scratches and disk warping.
6. Use soft sleeved pouches and if possible use cases.
7. Use Isopropyl Alcohol bought from the Chemist to clean the optical drive's laser lens with an cotton bud and rub it gently, oil the arms of the laser pickup using machine oil or my favorite chemical, Vaseline.
Be sure to clean it off using methylated spirits.
8. If the drive is doesn't have warrenty left and the laser doesn't read the disk well you can try the laser pot
adjustment.
Next to the PCB of the laser you have an screw that is seated to a cup sort of thing.
For DVD drives there will be 2 and for CD drives there is one.
Grab an Multimeter and do some readings first, touch the one connector on the screw and one on the base.
Tweak the pot clockwise 15 degrees and test. Repeat if required.
If it still doesn't work then one of the chips on the drive is screwed so forget it.
9. Never attempt to repair the disk from scratches either yourself or letting someone else do it.
Disks can be unbalanced and scratch removal is not worth it, since they are polishing an layer off the surface.
10. Use the media's rated burn speed and never use slow speeds, CLV is an older write strategy and is usually used on slower speeds. CAV ranges from 12x to 20x.
11. DVD burners are very flexible at almost every blank media make sure you have an burner that is rated 22x or
faster to ensure you have the companies support for future firmware updates.
12. Update your firmware with an newer one according to your model of burner, this helps some improvements to
some disk's, such as speed, quality. This is risk free as I flashed many drives and never had an bricking situation.
13. Avoid Lightscribe or Secure Disk. Your burner has enough bells and whistles, like it or not you are likely to be
throwing away the disks after awhile.
CLV, CAV, Z-CLV, best for most reliable burn?
CD recording was based solely on CLV technology until 16x recording speed, at which speed the rotational speed at the inner track reaches 8,640RPM.
Laser and the chemical dye was capable of accepting higher linear velocity, but increasing the spindle speed much above ~9,000 RPM would make vibration management and tracking difficult. The next generation was based on Z-CLV technology which starts at 16x recording speed and increase speed in steps. In each step, recording speed is kept constant and a graph of the recording speed would look like a stairway. This seems to be the most common recording stragegy in modern recorders.
There are some recorders using CAV (constant angular velocity) writing method which is based on constant spindle speed and varying writing speed as the laser moves across the radius.
Which writing method produces the highest quality burns if any consistent difference between the methods?
I can name pros and cons for each method, but I do not know how they actually interect with writing quality.
Pros:
CLV: The laser sees the disc moving at the same linear speed (m/s) throughout the whole recording session therefore the interection between the dye and the laser is consistent.
Z-CLV: Permits higher speed than 16x
CAV: Spindle speed is kept constant while the write speed constantly changes. Constant spindle speed can keep the vibration amplitude and frequency constant.
Cons:
CLV: varying RPM will cause the disc to vibrate at different amplitude and frequency as RPM approaches and drifts away from the natural resonance of the disc which could theoretically effect write quality
Z-CLV: Because the laser must change power each time the write speed is in changed and the data flow stopped while the speed is being changed, consistent burn may not be guanrateed and there maybe a seem at transition process which may become an issue when you burn a pre-master disc.
CAV: The interection between organic dye and laser can't be predicted exactly as the linear velocity and laser power must be changed continuously.
Overall CAV speeds are more favorable for lower errors.
For single layer DVD it ranges from 16x and higher.
For CD it ranges from 40x and higher.
Video region standards:
This is for consoles, if the region doesn't match the TV's one the game will be black and white on the TV.
The fix for this is to try out your TV and figure it out what I can't output.
Afterwards look at your console's mod type, some modchips allow a GUI to be loaded and you can change the region settings there.
This can also be done with some homebrew software.
Some games allow video region to be changed during bootup.
If you can't change you can buy a special type of video switcher, I don't know the exact name.
__________________________________________________________________________________________
[DCO] Overclocking
This is my favourite part of computer hardware, its a mixed bag whether it will work for you.
What is Overclocking?
Overclocking is a dubbed term for making an computer component work at a higher clock rate than its rated one.
What are the benefits of Overclocking?
Benefits are not really much unless you are into really hardware intensive programs.
For instance you do video editing or gaming, you are likely to see about 20% improvement in performance, in video editing you will notice that it will take 20% shorter time to encode that video.
In gaming for instance you will see about 20% increase in frame rates.
What can you Overclock?
Earliest attempts since the beginning in overclocking, the CPU was the primary intention.
So you can overclock the: CPU, Memory, Video Card Clockspeed, Video Card Memory Clockspeed.
You can also overclock the PCI Express Clock, however benchmarks currently prove it isn't worth it as you don't even see a little improvement in performance. Other than that it kills stability.
What are the requirements of Overclocking?
A CPU that has a good overclocking potential.
A Motherboard that has a good overclocking potential.
What are the risks of Overclocking?
The worst case scenario is a CPU will die in a few months, this could be 2 reasons: overheating and overvolting.
What is recommended for Overclocking?
Usually you would use desktops for this adjustment as laptops will have heat management issues.
Since on laptops you can't really change the cooling setup.
So the first key ingredient is a good cooling system.
A general rule is to look at reviews on the net for a specific cooler that you can get. Tomshardware is a good place, so are Xbitlabs etc.
Electrical components usually have a tolerance of +- 10% in voltage.
So if you don't exceed the limitations, you will get a decent lifespan in your component.
Still if you manage your cooling and voltages, you will get 3-5 years or even more working years.
What type of cooling methods are good?
From best cooling power to worst cooling power:
LHe (Liquid Helium)
LN2 (Liquid Nitrogen)
Dry Ice (Carbon Dioxide in solid form)
Phase Change (Refrigerator)
Peltier (Hot source and cold source)
Water Cooling
Ionic Wind
Air
Passive
LN2 is usually done by placing a cup directly ontop of a CPU, since if you laid the motherboard flat on the table, it will seem impossible to cool the video card since its vertically aligned.
Usually the water molecules in the air will freeze in the surroundings of the cooler, so you have to insulate the motherboard's components to avoid shorting out the tracks.
Overclockers often use electrical tape or insulating putty to combat this.
So a verdict on this is that it is only good for overclocking tournaments or
some guys that just want to set some records.
As liquid nitrogen boils off at very low temps, a constant supply is required.
And since liquid nitrogen is very cold, it can be very dangerous if not handled properly.
Dry Ice isn't as effective as liquid nitrogen however it is easier and more safer to use, the same problem occurs however and that is a constant supply is required for normal use.
Since every motherboard is different, I'll give the general idea.
CPU overclocking:
First of you can do this many ways.
Before Bios overclocking is made, people had to use jumpers to overclock their processors.
Nowadays you can use Bios, motherboard OEM's tool such as Easy Tune from Gigabyte, Asus's AI Booster etc.
Or for AMD Phenom users you can use AMD Overdrive.
I'll cover the Bios overclocking method as it gives you more control over your overclock which most programs don't offer.
There are 2 ways of overclocking the CPU, the Bus overclock and the Multiplier overclock or a combination of both.
Since most CPU's have their Multiplier locked, Bus overclocking is required.
Pros of Bus overclocking:
We get the best bandwidth across every major component.
All decent CPU's can have their Bus's overclocked.
Cons of Bus overclocking:
Memory frequency raises alongside the Bus.
IDE, AGP Buses etc are raised alongside the Bus.
AMD CPU overclocking:
To this I refer to K8 to K10 CPU's.
To start off you find out your memory speed via CPU-Z.
400Mhz gives DDR2 800, 533Mhz gives DDR 2 1066 etc.
There are various memory around ranging from DDR, DDR 2 and DDR 3.
DDR is essentially phased out shown by the increase in memory price and DDR 2 is phasing out very soon.
You can overclock the memory however its often tricky since you have to get the timings right to get the best result and this takes time.
So I'll cover the memory divider method, since your CPU's bus is overclocked, your memory is overclocked as well as its linked.
What is the Memory Divider method?
When your CPU Bus is overclocked, the memory frequency raises which can cause stability issues.
So increasing the memory ratio or in some Bioses you decrease the memory speed.
So by decreasing the memory speed, you can make your CPU's Bus run faster without worrying about timings for the memory or clockspeed of the memory.
Now you find out what is your Hypertransport frequency which can be done in CPU-Z as well.
Check your CPU's clockspeed, if it changes by plenty of Mhz, say for 200 or greater, that means your CPU's power saving function is on.
By AMD it will be Coolin Quiet.
Now its a good idea to turn it off to get a reading on what your CPU's default clockspeed is and other values such as Hypertransport frequency and CPU voltage.
Now head into the Bios, for most motherboards it will be DEL key or on some F2 or can be anything.
Refer to the motherboard's manual which can be found on the OEM's website.
For my example, I'll refer to common the Phoenix Bio menu.
Head into Advanced Chipset features.
Turn off every CPU feature except for SSE2 instructions or any SSSE named function.
Push ESC.
Head into Frequency/Voltage control.
Drop the Hypertransport frequency down a bit if available.
Drop the memory divider to 333 etc if yours is 400 on default.
Increase CPU frequency to 230Mhz etc.
Raise CPU voltage by 5% from the default.
Boot into Windows and run a 4 hour Benchmark with Prime 95 with 8x8 setting.
If no errors are detected, go back to the Bios and repeat the CPU manipulation steps.
Note: if your computer locks up during booting, reset the Bios, this can be done via jumpers, refer to the manual.
Or it can be done using the CMOS battery removal which is just the single battery on the motherboard.
Admin- Admin
- Đánh giá tốt! : 7


Tổng số bài gửi : 10417
Birthday : 09/10/1979
Tuổi : 44
Địa chỉ: : Phú Yên
Điện thoại: : Mobile: (84) 0985 017 089
Điểm : 61210
Ngày đăng ký : 13/10/2007 -


» Warez User Guide For New Users
» Opera 10.60 Warez-bb custom search in address bar
» DJ's Complete Guide DVD
» Opera 10.60 Warez-bb custom search in address bar
» DJ's Complete Guide DVD
Trang 1 trong tổng số 1 trang
Permissions in this forum:
Bạn không có quyền trả lời bài viết
» Hộp đựng đa năng trong phòng tắm và các đồ dụng tiện llợi khác
» gel bôi trơn ấm áp warm lovin
» màng film tránh thai vcf dành cho chị em
» màng film tránh thai vcf dành cho chị em
» stud 100 khẳng định đẳng cấp phái mạnh
» Lover aider máy mát xa dành cho nữ
» cung cấp máy ép dĩa chất lượng
» Máy in hình lên ly
» Máy in hình lên áo
» trang trí cây thông noel ở vinh,cho thuê cây thông noel ở vinh,chuyển quà noel ở vinh
» Máy in hạn sử dụng DMJ-B chính hãng, giá sốc
» Dạy cắm hoa chuyên nghiệp,dạy cắm hoa nghệ thuật,dạy cắt tỉa của quả ở T.p Vinh Nghệ An
» công ty Yên Phát chuyên phân phối, lắp đặt camera chính hãng giá rẻ nhất miền Bắc.
» HOT! Chung cư mini Xuân Đỉnh ở ngay giá chỉ từ 690 triệu 1 căn